Monday, January 30, 2012

Cherry-Vanilla Tea Cake with Vanilla Sugar : Free and Easy Bake-Along #17

Thank you for all the Chinese New Year wishes!! I'm back from the week long Chinese New Year holidays and had a nice time travelling to my in-laws' and my dad's home. Well, CNY is not over yet, it will last for a total of 15 days and looking forward to another party this weekend!

Cherry-Vanilla Tea Cake with Vanilla Sugar, sounds really nice and fragrant! We made this for our Bake-Along, together with Lena from Frozen Wings and Zoe from Bake For Happy Kids.


The cake is a soft tender butter cake, lightly spiced with nutmeg. After the cake is baked, the top is sprinkled with vanilla sugar, a mixture of vanilla seeds with some sugar and confectioners' sugar while still hot, about 10 minutes after baking, then left to cool so that some of the sugar melts on the top.


This cake is perfect to go with tea! It's texture is light, tender, soft and moist. At first I was afraid that it might be sweet, but since I did reduced the sugar in the cake itself, so this is not a too sweet cake, really nice with the fragrant vanilla sugar.


Though some of the cherries stays throughout the cake, most of it settled at the bottom. But then, it does not affect the yumminess taste of the cake one bit!!


Overall review : A nice cake to have with a cup of tea for afternoon tea-break. It is light, soft, moist and tender. Another keeper recipe from Bon Appetit Desserts Cookbook.


Let's go over to Lena's and Zoe's and also to our friends in the linky below. For our next Bake-Along, we will be baking based on a theme "Red Velvet Cupcakes" which we will post on 13/02, in time for Valentine! Everyone's welcome! Just bake any Red Velvet Cupcakes and join us as we celebrate Valentine's Day! See you!


Photobucket


Cherry-Vanilla Tea Cake with Vanilla Sugar
(adapted from "Bon Appetit Desserts" by Barbara Fairchild)
A springform pan is ideal for this cake. The powdered sugar topping can be sifted over the hot cake while it's still in the pan - allowing some of the sugar to melt ever so slightly - then the sides can be slipped off without disturbing the topping. Tossing the cherries with the reserved flour mixture before they're added to the batter prevents them from sinking to the bottom
10 servings


1-1/2 cups unbleached all purpose flour
1 teaspoon baking powder
1/2 teaspoon baking soda
1/4 teaspoon salt
1/8 teaspoon ground nutmeg
1/2 cup (1 stick) unsalted butter, room temperature
1 cup plus 1 tablespoon sugar (I use 3/4 cup)
2 large eggs, room temperature
2 teaspoons vanilla extract
2/3 cup sour cream (I use homemade yoghurt)
1 teaspoon finely grated lemon peel (I use orange zest)
1 cup canned pitted sweet cherries, halved, drained
1/2 vanilla bean, split lengthwise
2 tablespoons powdered sugar


Preheat oven to 350F. Lightly butter and flour 10-inch-diameter springform pan with 2-3/4-inch-high sides. Sift flour, baking powder, baking soda, salt and nutmeg into medium bowl. Using electric mixer, beat butter and 1 cup sugar in large bowl until well blended. Add eggs 1 at a time, beating well after each addition. Blend in vanilla extract. Transfer 2 tablespoons dry ingredients to small bowl. At low speed, beat half the remaining dry ingredients into butter mixture, then mix in sour cream and lemon peel. Beat in remaining half of dry ingredients. Mix cherries into reserved 2 tablespoons dry ingredients; fold cherries into batter.
Spoon batter into prepared pan, smooth top. Bake until tester inserted into center of cake comes out clean, about 30 minutes. Transfer cake to rack and cool 10 minutes.
Meanwhile, using small sharp knife, scrape seeds from vanilla bean into small bowl. Mix in remaining 1 tablespoon sugar, rubbing with fingertips to distribute seeds. Add powdered sugar and rub again.
Sift vanilla sugar over hot cake and cool. Cut around pan sides to loosen cake, remove pan sides.

Do Ahead : Can be made 1 day ahead. Cover; let stand at room temperature.


Saturday, January 21, 2012

GONG XI FA CAI !!

Here's wishing all my Chinese blogger friends 
and readers  GONG XI FA CAI. May the year of the dragon brings you good health, happiness, prosperity and longevity!  And Happy Holidays to all!


chinese-new-year-003.gif
Chinese New Year - AnitJi.com


Will be back end January, see you soon!


********

Saturday, January 14, 2012

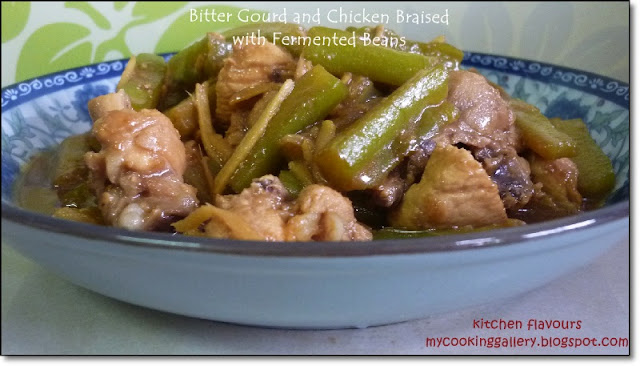
Bitter Gourd and Chicken Braised with Fermented Bean Paste

This is a common dish that almost every Chinese household would dish up in their kitchen. In my house, we love bitter gourd. Though  some of the bitterness may be lessen by marinating the sliced bitter gourd pieces with some salt, squeeze out some of the bitterness, rinse and cook as usual, I would usually omit this step. As my hubby says, it wouldn't be called a bitter gourd for nothing! This is one dish that you would not find in a Chinese New Year menu, definitely a no-no! In Chinese, bitter gourd melon is known as "fu gua", the word '"fu" meaning bitter, and having this melon at the start of a lunar year means that you will have a year of "bitterness". Nobody would want that! Since Chinese New Year is celebrated for 15 days, then it is alright to consume this melon after that period is over. 


The ingredients needed for this dish : chicken pieces (skinless), slices of bitter gourd, pounded garlic, fermented bean paste and julienned ginger.


A plate of Bitter Gourd and Chicken Braised with Fermented Bean Paste is ready for our dinner.


It is not as bitter as you  imagine it would be. It is really an acquired taste and once you "accept" the bitterness, it is really delicious! There are many varieties of Bitter Gourd Melon, their bitterness varies with  each variety. The one I use above is what we commonly called the Chinese Bitter Gourd. Choose the ones with pale green in colour, it will be less bitter than the dark ones.


Bitter Gourd is good for you! It is low in calories and has high dietary fiber. It has excellent source of nutrients with vitamins B1, B2, B3, magnesium, folic acid, Vitamin C, zinc, phosphorus, manganese and rich in iron. It contains twice the beta-carotene of broccoli, twice the calcium of spinach and twice the potassium of a banana! Wow! All the goodness and delicious too! Have you tried Bitter Gourd Melon before, if not, then give it a try!  


Bitter Gourd and Chicken Braised with Fermented Bean Paste
(by kitchen flavours)
1 medium bitter gourd
1 whole chicken thigh, skinned, and cut to small bite-sized pieces
1 tablespoon cornflour
1 tablespoon water
2 tablespoon cooking oil
1-2 tablespoon ginger, julienned
4 garlic cloves, pounded
1 tablespoon fermented beans paste
1 tablespoon oyster sauce
1 teaspoon black soy sauce
1 teaspoon light soy sauce or to taste
1/2 cup warm water


  1. Cut bitter gourd to half lengthwise. Using a spoon, scoop out seeds and discard. Cut bitter gourds to 1-1/2" to 2" lengths and slice lengthwise to about 1/2 inch thickness.
  2. Marinate chicken pieces with cornflour and 1 tablespoon water. Keep aside for 10 minutes.
  3. Heat oil. When oil is hot, add in ginger, stir for a minute until fragrant. Add in pounded garlic, fermented beans paste, and stir for about 1-2 minutes until fragrant.
  4. Add in the chicken pieces and stir until chicken is no longer pink. Add water, stir to combine and cover, lower heat and simmer for about 5 minutes, stirring once or twice. 
  5. Add in bitter gourd, oyster sauce, black soy sauce, light soy sauce and stir till well combined. 
  6. Cover and continue to simmer, stirring now and then, adding a little water if appears dry, until bitter gourd is tender and chicken is cooked.
  7. Dish up and serve hot.

Thursday, January 12, 2012

Brownie Buttons : Free and Easy Bake-Along No. 16 - Theme : Brownies

I am late for my own Bake-Along "Brownie" posting. I was absent for a week as there was some personal matters that I have got to attend to and now that everything is fine, I can't help thinking about baking something! So here's my brownie!


This is a fairly easy brownie to make, really quick, it was done in about 20 minutes. It has a moist and soft cake-like texture. Do not skip the white choc coating, I think it taste better with the white chocolate.


Photobucket


If you have not visited my baking buddies Lena and Zoe, do hop over to their blogs and see their lovely brownies. Also please do visit our other baking friends delicious brownies,  in the linky below. For our next Bake-Along, we will be baking Cherry Vanilla Teacake with Vanilla Sugar, from Bon Appetit Desserts cookbook, or you may get the recipe here.  We will post it on 30/01 and our linky will stay open for 5 days, please do join us. See you!


Brownie Buttons
(adapted from "Baking From My Home To Yours" by Dorie Greenspan)
Grated zest of 1/2 orange (optional)
1/4 cup plus 2 tablespoons all-purpose flour
pinch of salt
1/2 stick (4 tablespoons) unsalted butter, cut into 4 pieces
2-1/2 ounces bittersweet chocolate, coarsely chopped
1/3 cup (packed) light brown sugar (I use scant 1/3 cup, loosely packed)
1/2 teaspoon pure vanilla extract
1 large egg


For the glaze (optional)
2 ounces white chocolate, finely chopped


GETTING READY :
Center a rack in the oven and preheat the oven to 350 degrees F. Lightly butter two miniature muffin pans, each with a dozen cups, and place them on a baking sheet.
If you're using the orange zest, combine the zest and sugar in a small bowl, rubbing them between your fingertips to blend, set aside. Whisk together the flour and salt.
Melt the butter, chocolate and brown sugar in a medium heavy-bottomed saucepan over very low heat, stirring frequently with a heatproof spatula and keeping an eye on the pan so nothing overheats or burns. When the mixture is smooth, remove from the heat and cool for a minute or two.
Stir the vanilla, egg and the zest, if you're using it, into the chocolate mixture. When the mixture is well blended, add the flour and stir only until it is incorporated. You should have a smooth, glossy batter.
Spoon the batter into 16 of the muffin cups, using about a teaspoon of batter to fill each cup three-quarters full. Put 1 teaspoon of water in each empty cup.
Bake for 14 to 16 minutes, or until the tops of the buttons spring back when touched. Transfer the pans to racks to cool for 3 minutes before carefully releasing the buttons. Cool to room temperature on the racks.

TO MAKE THE OPTIONAL GLAZE :
Melt the chocolate in a small heatproof bowl set over a saucepan of simmering water. Stir constantly and don't leave the chocolate for even a minute - white chocolate scorches easily. As soon as the chocolate is smooth, remove from the heat.
One by one, dip the tops of the buttons into the chocolate, twirling the buttons so that you get a little swirl at the center of each one and the excess chocolate drips back into the bowl. Refrigerate the buttons for 15 minutes to set the glaze.

kitchen flavours notes :
Watch out for the baking time, mine was done in about 10 minutes.


Friday, January 6, 2012

Cauliflower Pickles

These Cauliflower Pickles are so addictive! They are great served alongside roasted meats, and make really good appetizer, in my case, so addictive to snack on, that it is so difficult to stop! I have made this a couple of times already, and everyone who has tasted this love it!


They do look kinda plain, but do not let that fool you, make a batch and see for yourself!


For full flavour, make these a couple of days before serving, I let them sit in the brine solution, stored in the fridge for three days before I actually eat them.  On the second day, I tested one (alright, a few!) and found that I got to add in more rice vinegar and sugar, depending on how sour or sweet you want. Stir with a chopstick or long spoon and wait for another day or two before consuming.


Do not cut the florets into big chunks, just cut them up into suitable sizes that are easy to pop into the mouth in one bite! It makes munching easier and is tastier as the solution gets soaked into the florets! Trust me! If you are not a fan of cauliflower, this might turn you around.


These should be eaten cold, right out from the fridge. Crunchy, sweet, sour with a tinge of the garlic and ginger. If you do not like the strong garlic smell, just reduce the amount to 1 clove. However, if you love garlic, do not be tempted to put in more, the taste of the garlic will be too strong. Just follow the recipe for the right amount of garlic. Pop the garlic and ginger in your mouth when you have finished with the cauliflower! Yum! Great as a refreshing appetizer for parties! I made this for a Christmas party two weeks ago and will be making this again for the coming Chinese New Year. There will be lots of "rich food" during festivities and this will be a great "snack"!


I'm sharing this with :
Cookbook Sunday hosted by Couscous & Consciousness
Full Plate Thursday hosted by Miz Helen's Country Cottage


This is the original recipe, you may adjust the rice vinegar, sugar and salt according to your own taste. This recipe makes a large amount. I halved the recipe and got three bottles as per the photos above.
Cauliflower Pickles
(adapted from "The Chinese Kitchen" by Eileen Yin-Fei Lo)
3 quarts cold water
5 garlic cloves, peeled
One 1-inch-thick slice fresh ginger
3-1/2 pounds fresh cauliflower, cut into 1-1/2-inch florets
1-3/4 cups sugar
1-3/4 cups Chinese white rice vinegar or distilled vinegar
5-1/2 cups cold water
4 teaspoons salt

  1. In a large pot, bring the 3 quarts of water to a boil with the garlic and ginger. Add the cauliflower and blanch for 30 to 45 seconds. Do not overcook. Remove from the heat and run cold water into the pot. Drain. Fill the pot with cold water and let the cauliflower rest in cold water for 15 minutes, then drain.
  2. In an oversized glass jar, place the sugar, vinegar, 5-1/2 cups water, and salt. Stir with a wooden spoon to ensure that the sugar and salt are completely dissolved. Add the cauliflower, garlic, and ginger. Cover the jar. (A jar with a plastic screw top is preferred, if unavailable, place a piece of plastic wrap over the top before closing.) Refrigerate for at least 24 hours before serving. Serve cold. The cauliflower pickles will keep, covered and refrigerated, for up to 6 months.

Monday, January 2, 2012

Bernard Clayton's New Complete Book Of Breads

by Bernard Clayton


10. Honey-Lemon Whole-Wheat Bread
9. White Bread with Chocolate
8. Sister Jennie's Potato Bread
7. Honey Oatmeal Bread
6. Jalapeno Corn Bread
5. Rosemary-Garlic Bread
4. Onion Lover's Bread
3. Orange Oatmeal Bread
2. Briarpatch Herb Bread
1. Thirty-Minute White Bread

Nut-Crusted Chocolate Banana Swirl Cake : ABC Jan 2012

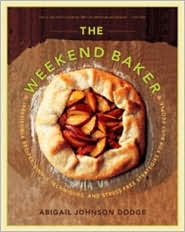
This is  my first post in 2012 and also with Avid Baker's Challenge (ABC). ABC is currently baking from "The Weekend Baker" by Abigail Johnson Dodge, also known as Abby Dodge. I have not baked any of Abby Dodge's recipes before this, but I am liking what I have baked.


Chocolate Banana Swirl Cake is the first recipe that ABC is baking from "The Weekend Baker" cookbook, and was chosen by Abby herself! I was pretty excited about baking this cake as it sounds delicious and it is! This cake is baked in a bundt pan which was greased and sprinkled with the mixture of chopped walnuts and sugar. The bananas are creamed together with the butter and sugar first, with the addition of eggs, buttermilk (which I substitute with the mixture of yoghurt and milk) and flour. I did reduce the sugar from the original of 1-1/4 cup (about 250gm) to 170gm, which is just right for me. Half the batter is then mixed with some melted chocolate.


Spoonfuls of the two batter are placed in the bundt pan, and finish off with a clockwise and anti-clockwise swirl with a spatula. 


It smells wonderful while it was baking in the oven. Could not wait to try a slice.


I could not help myself, ate a slice while still warm. Yum!


This cake has wonderful texture. It is moist and soft, with tender crumbs, with the right balance of bananas. The mixture of walnuts and sugar adds a wonderful bite, the crispy walnuts is a nice contrast against the soft tender cake. This is simply a wonderful cake, perfect for tea.


ABC book for 2012


This recipe can be found in "The Weekend Baker" or from Fine Cooking, here. Please visit ABC bakers to read other bakers's post on this lovely cake.

Bread

by Nick Malgieri

5. Part Whole Wheat Sandwich Bread
4. Pain de Mie
3. Hamburger Rolls
2. Golden Sandwich Bread
1. Old-Fashioned Raisin Bread